We're introducing an updated user interface (UI) for the Export to EPUB workflow action with the release of the Adobe InDesign plug-in version 31. The new UI has all the options as the old UI—they're just much more intuitively and logically organised now.
Plus, the new UI adds support for using SVG in EPUB files and specifying the custom unique identifier (<dc:identifier>) in the metadata section.
What changed?
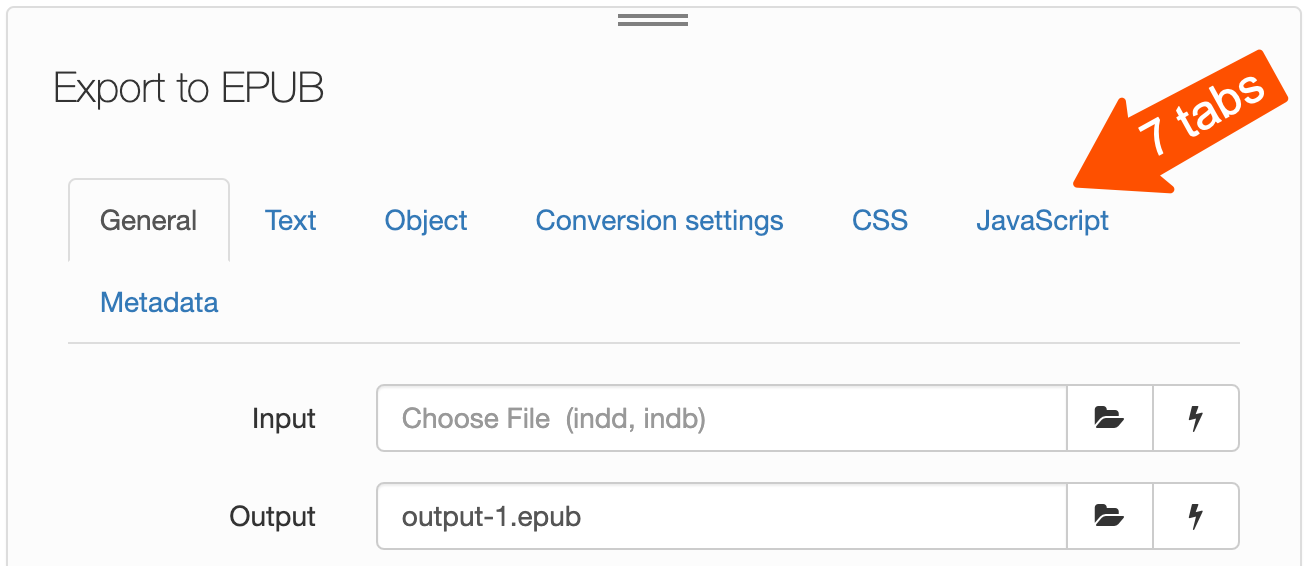
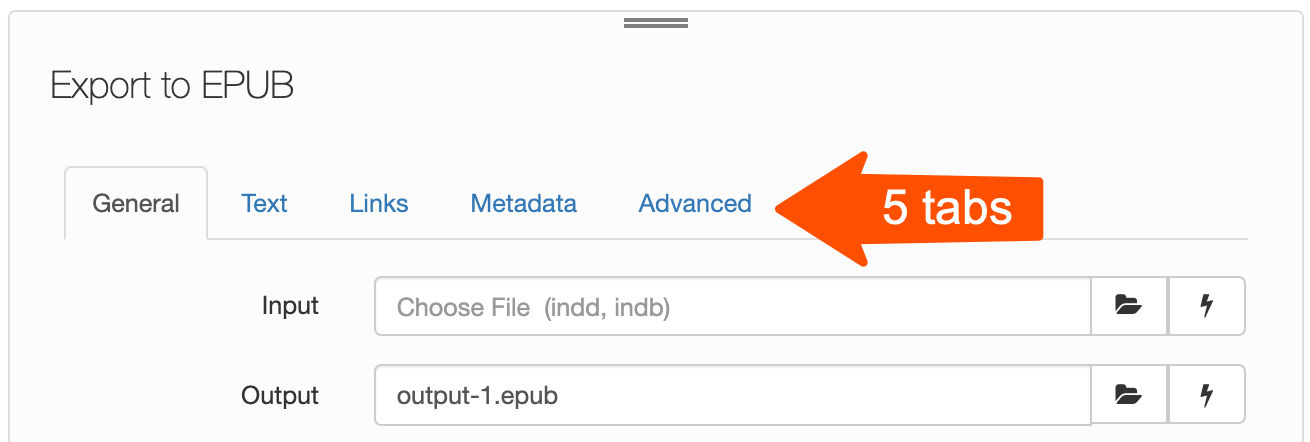
We reduced the number of tabs from seven to five.
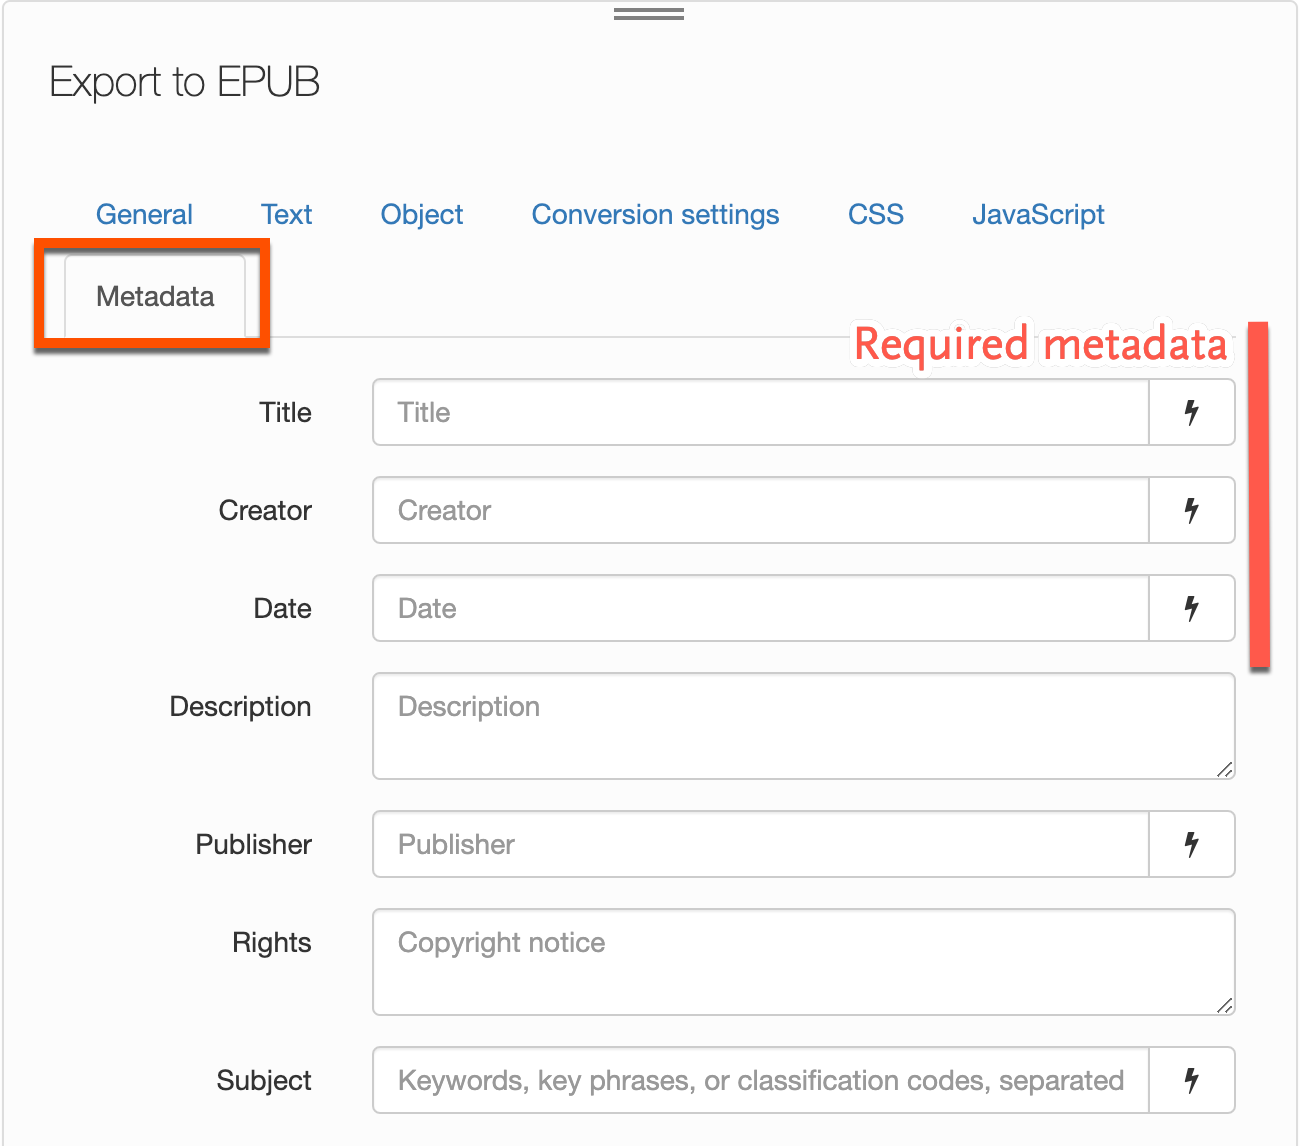
Old UI (version 30)
Tabs were General, Text, Object, Conversion settings, CSS, JavaScript, and Metadata.
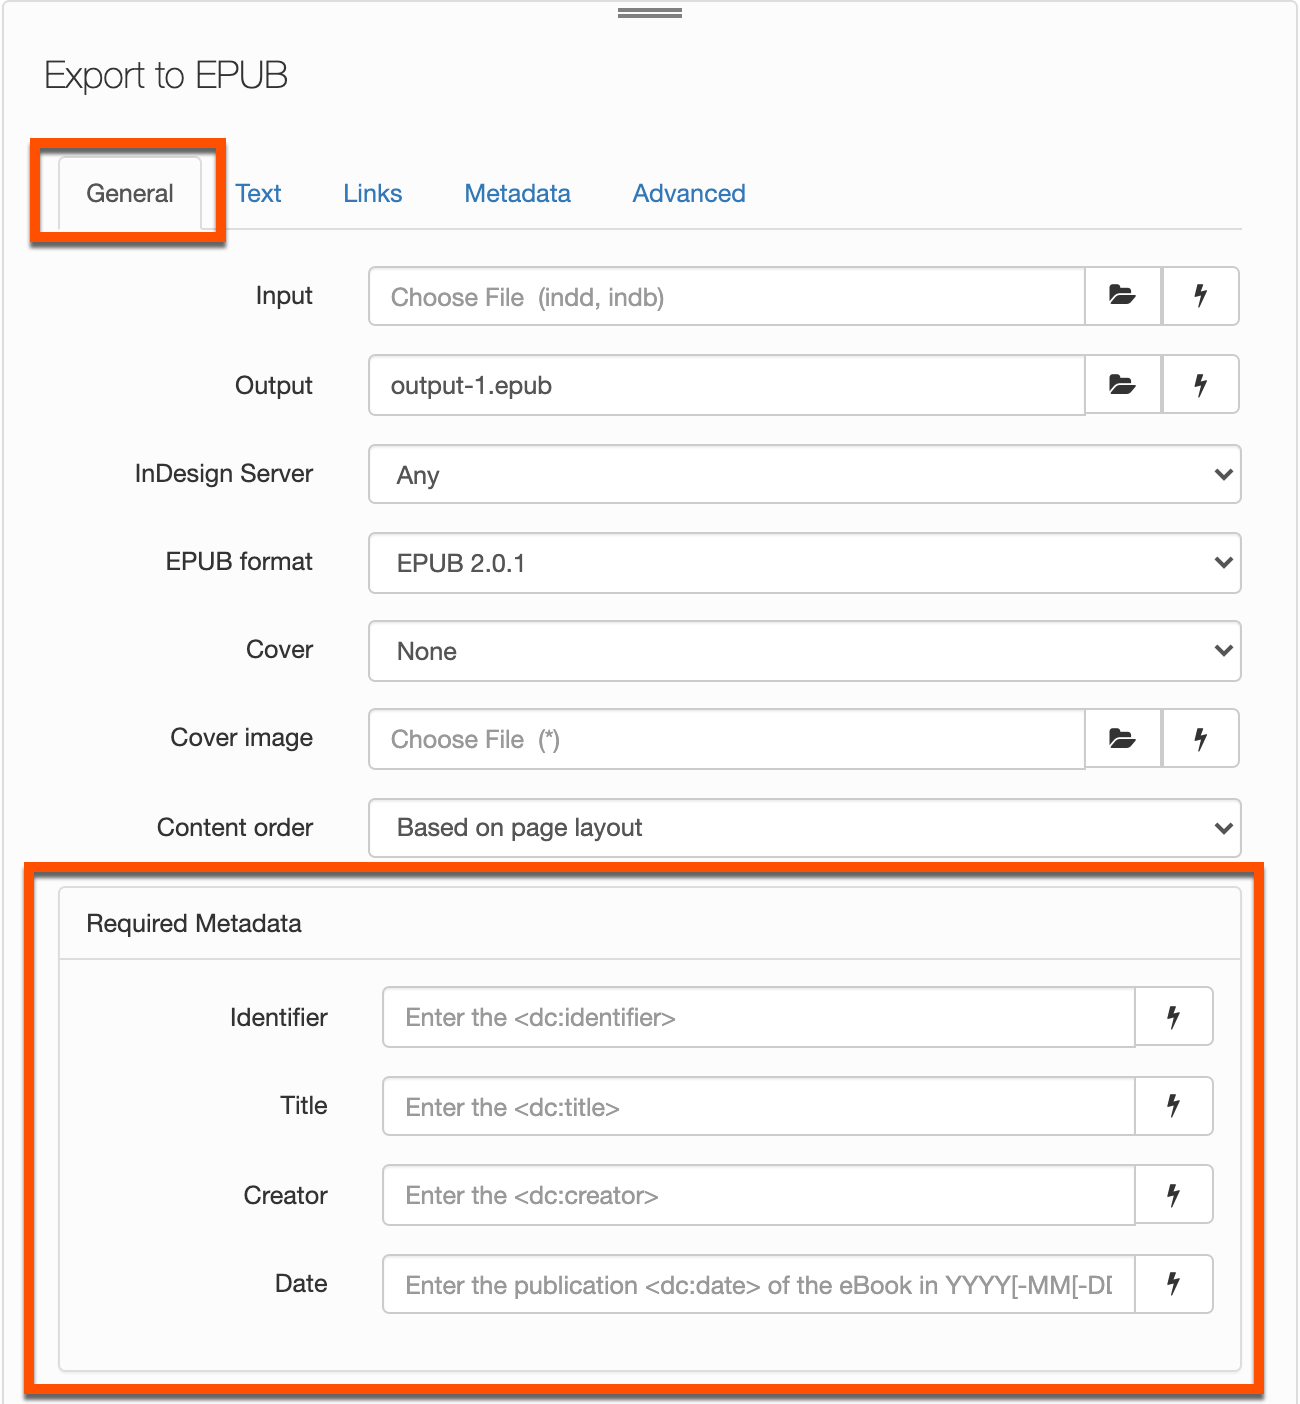
New UI (version 31)
Tabs are General, Text, Links, Metadata, and Advanced.
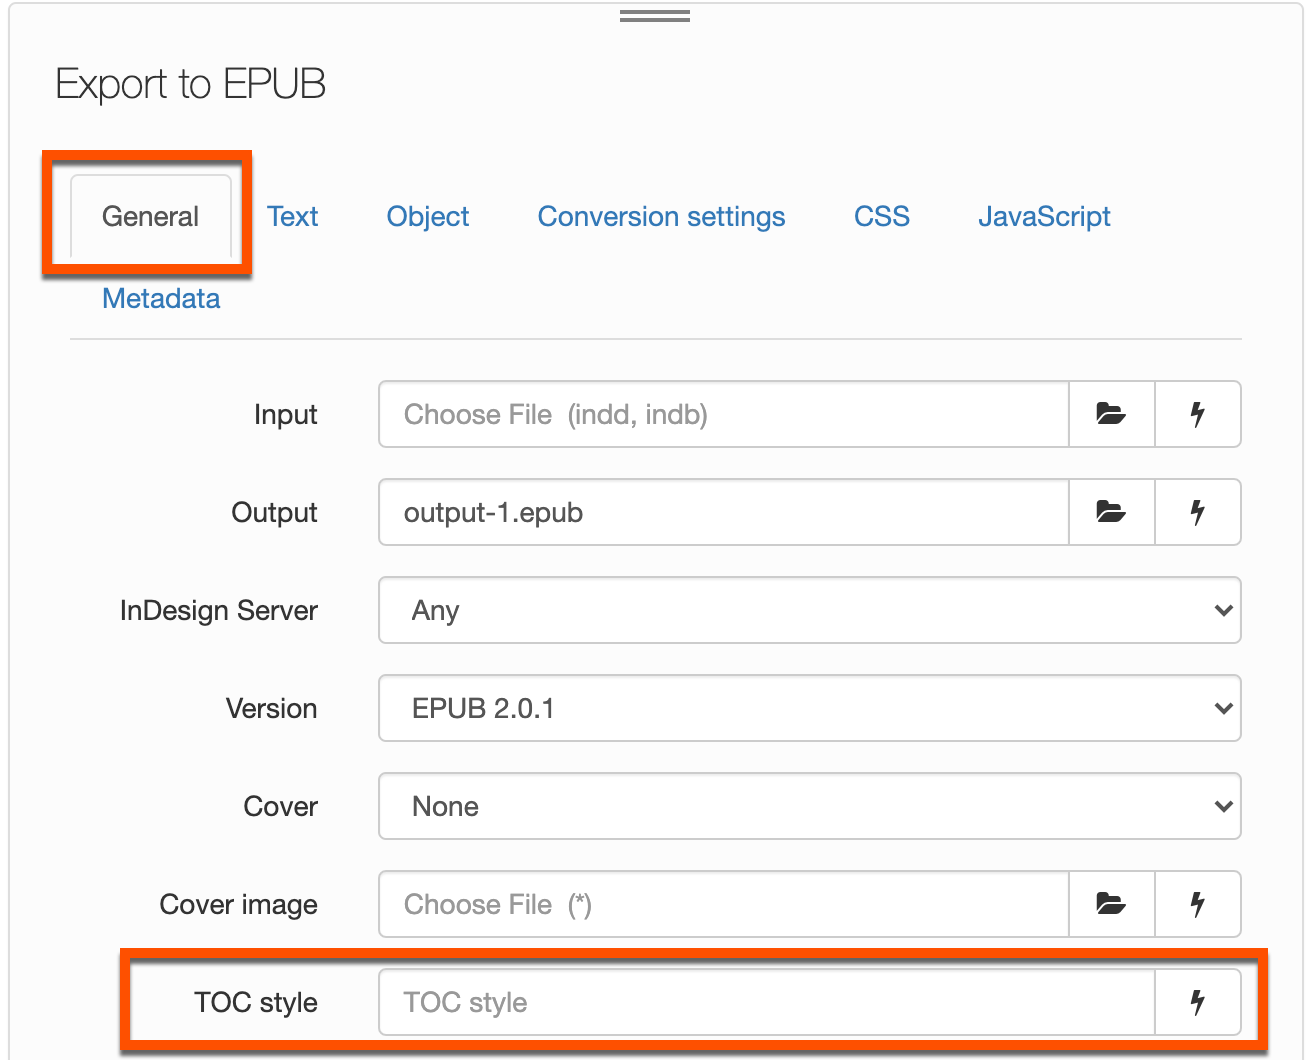
We moved the TOC style field.
Old UI (version 30)
The TOC style field was on the General tab.
New UI (version 31)
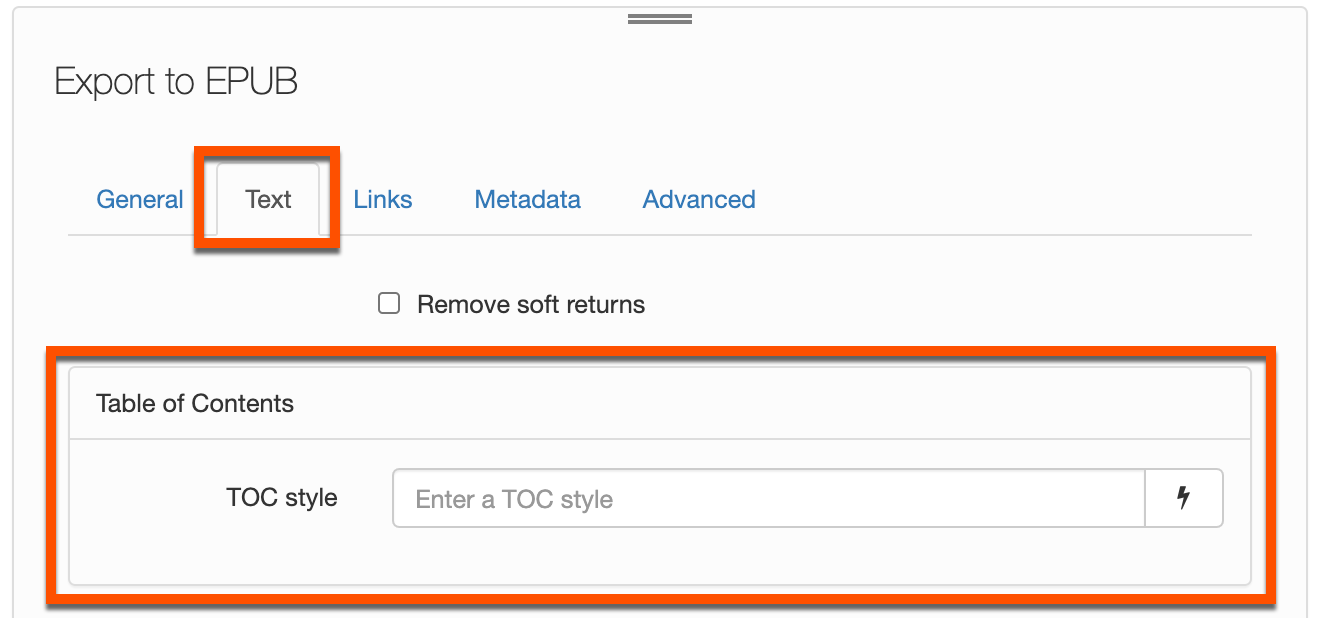
The TOC style field is on the Text tab, within the Table of Contents section.
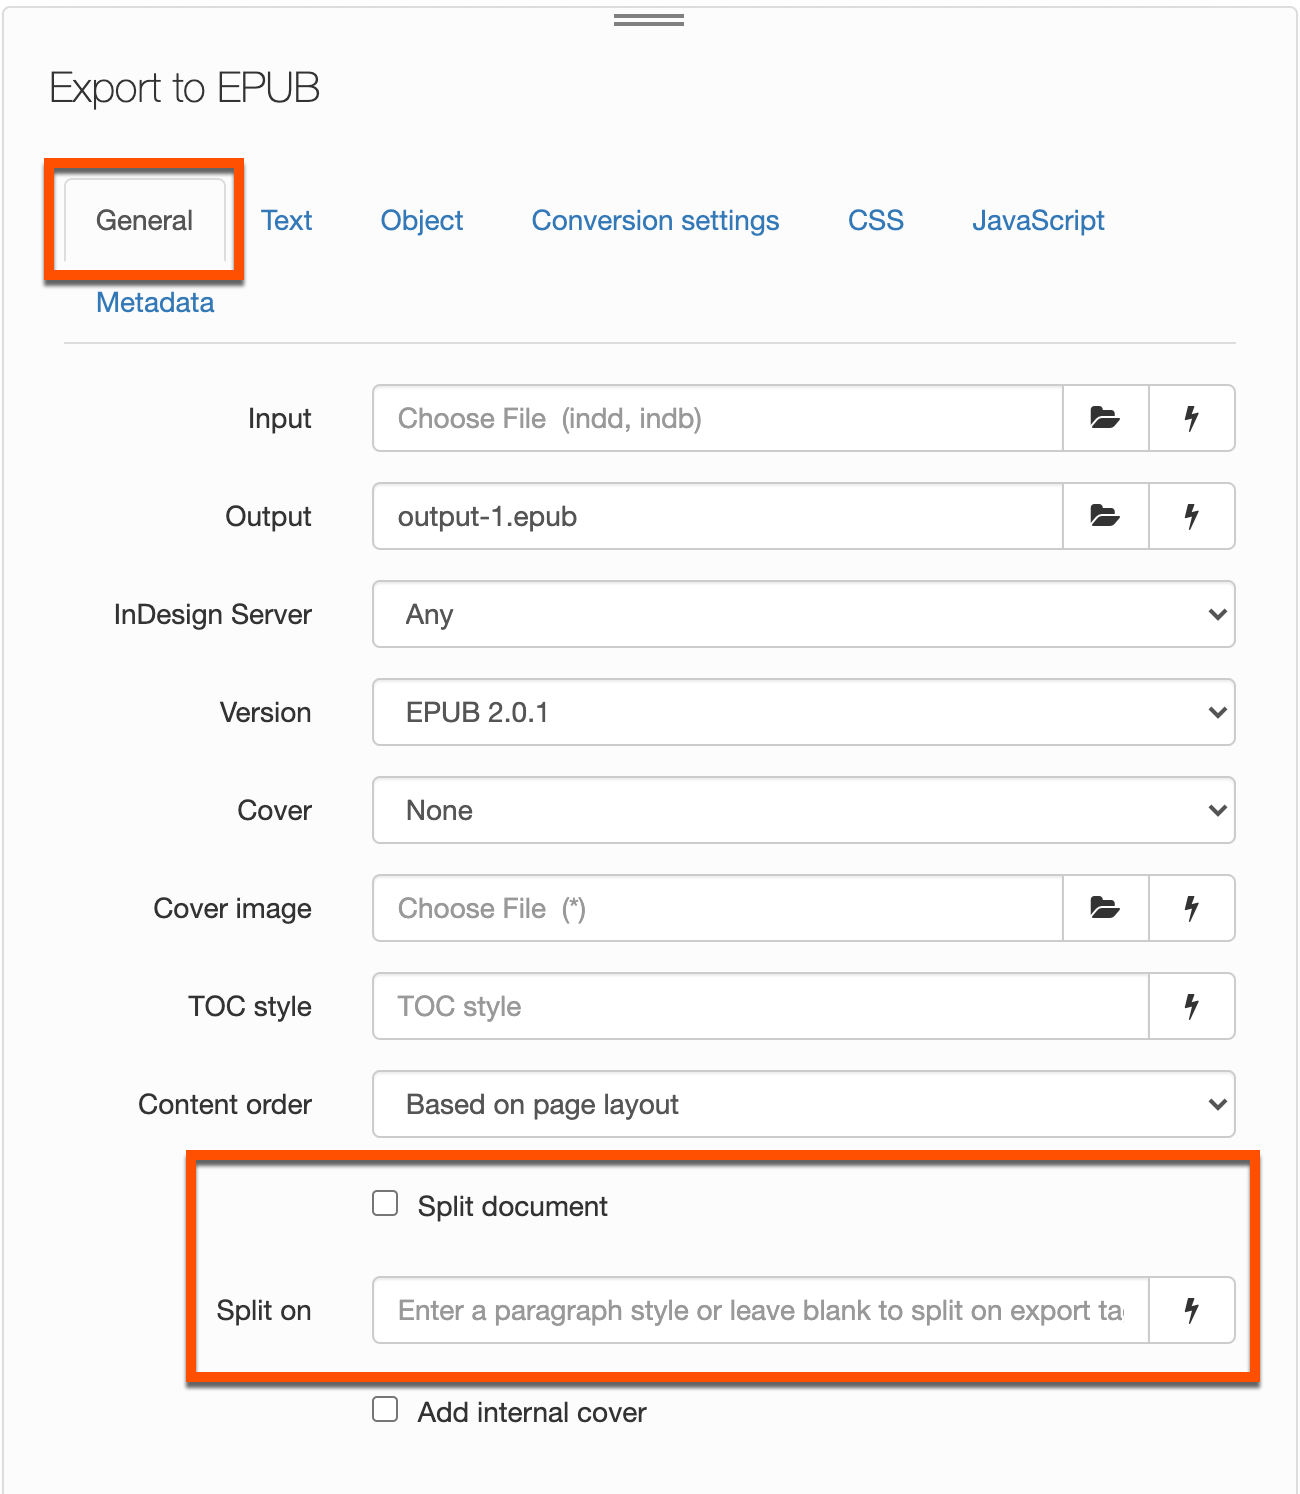
We combined the Split document checkbox and Split on field, and moved it. ↩
Old UI (version 30)
Split on was a pop-up menu on the General tab, and you could choose None, Export tags or Paragraph style. Paragraph style was a text field, and you had to either enter a paragraph style or leave it blank to split on the export tags.
New UI (version 31)
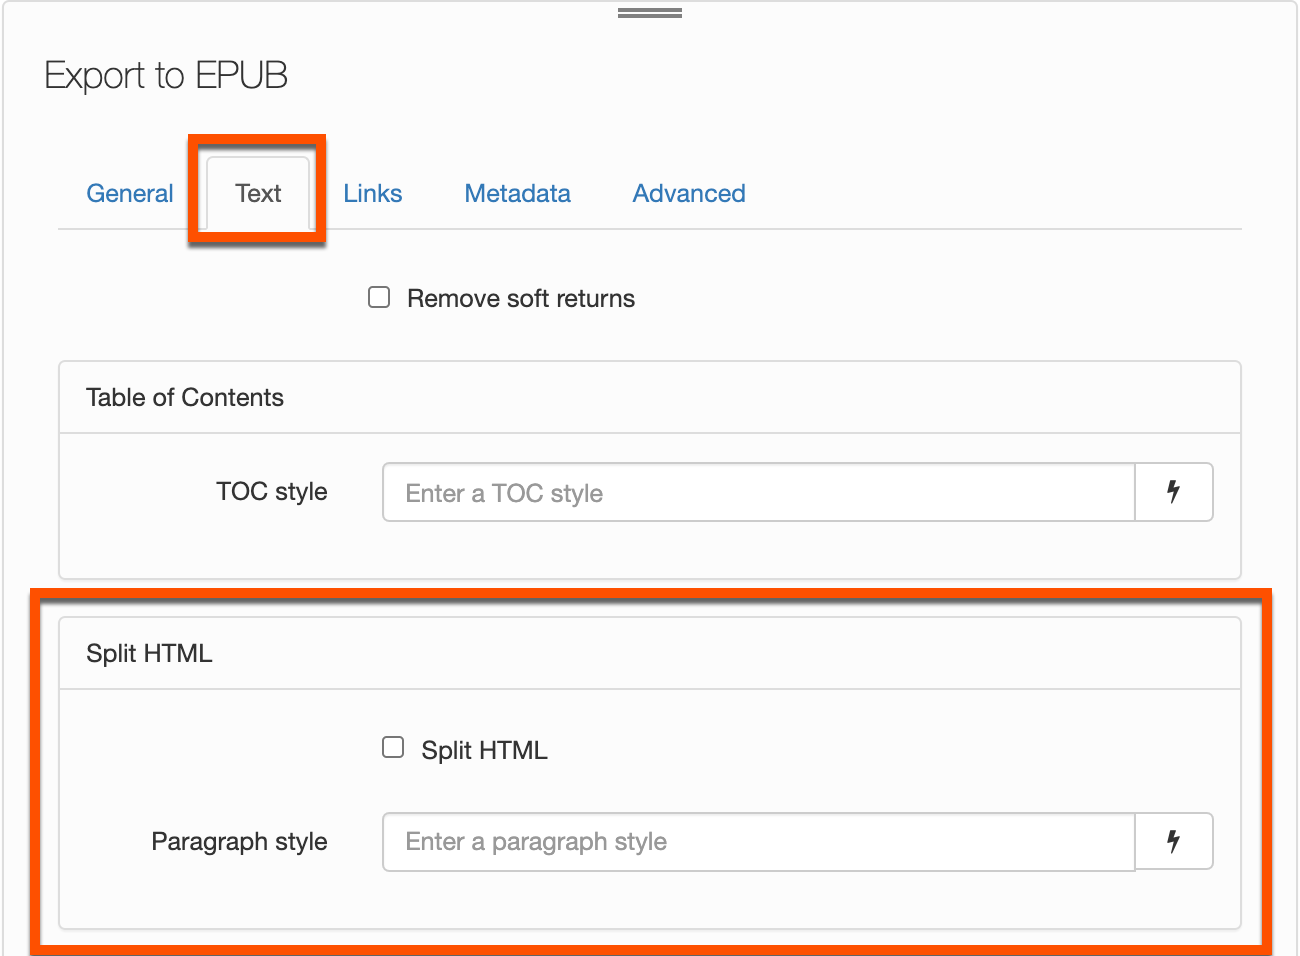
Split on is now a checkbox and called Split HTML on the Text tab. Split HTML is deselected by default.
- If Split HTML is deselected, it behaves the same as choosing None in the old UI.
- If Split HTML is selected and Paragraph Style is empty, it behaves the same as choosing Export tags from the pop-up menu in the old UI.
- If Split HTML is selected and you enter a Paragraph style, it behaves the same as choosing Paragraph style from the pop-up menu and entering a Paragraph style in the old UI.
We moved the required metadata fields to the General tab.
The required metadata fields are Identifier, Title, Creator, and Date.
Old UI (version 30)
All metadata, even the required metadata, was on the Metadata tab.
New UI (version 31)
The required metadata is on the General tab, so you can quickly enter it. The optional metadata is on the Metadata tab.
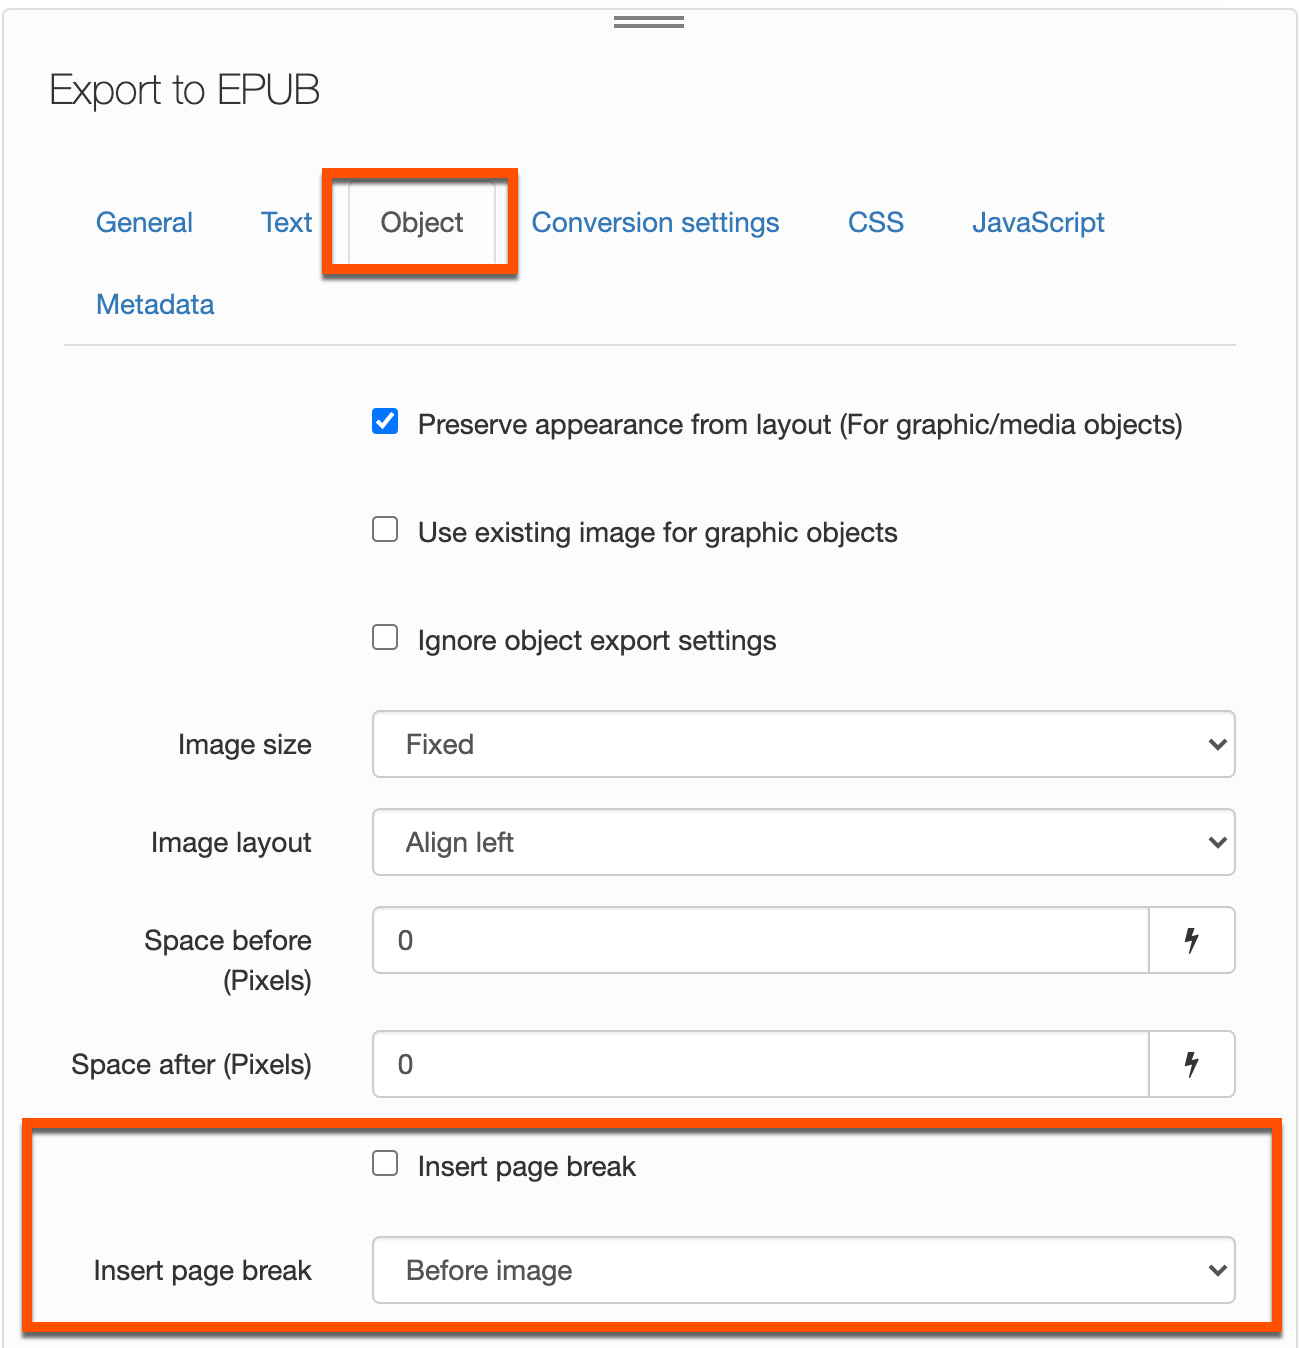
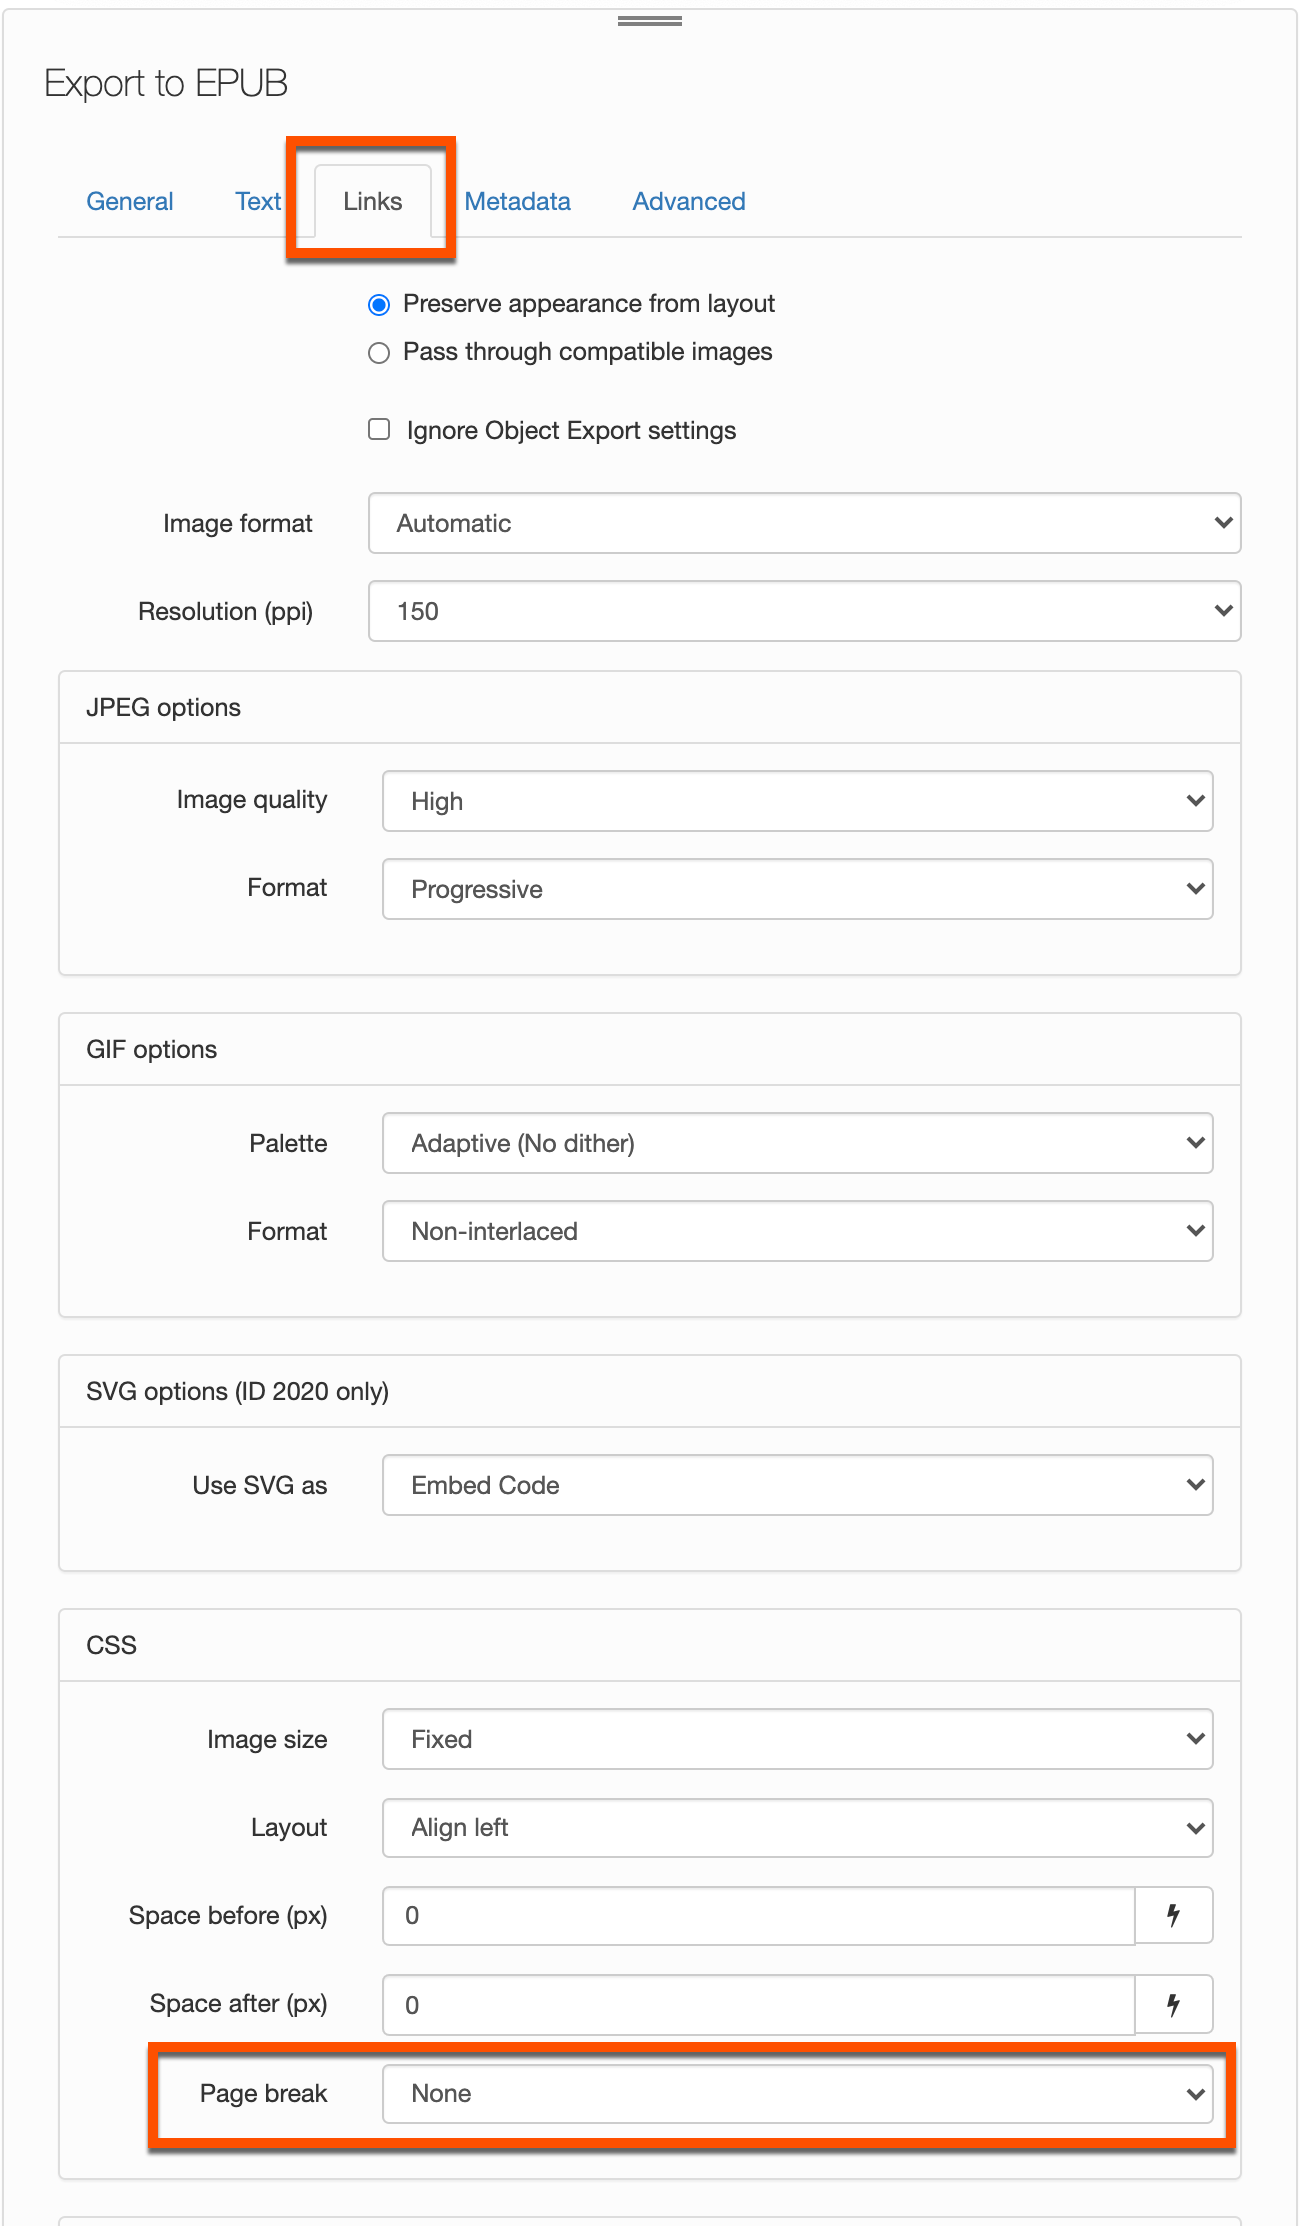
We removed the Insert page break checkbox, renamed the Insert page break pop-up menu, and moved it.
Old UI (version 30)
Insert page break was a checkbox and a pop-up menu on the Object tab. If you wanted to specify a page break, you had to select the checkbox and choose where to insert the page break.
New UI (version 31)
Page break is a pop-up menu on the Links tab, within the CSS section.
- None (default) behaves the same as deselecting the Insert page break checkbox in the old UI.
- Before image behaves the same as selecting Insert page break and choosing Before image in the old UI.
- After image behaves the same as selecting Insert page break and choosing After image in the old UI.
- Before and after image behaves the same as selecting Insert page break and choosing Before and after image in the old UI.
And, we re-arranged and grouped some options:
- The Add internal cover checkbox from the General tab is now in the new Advanced tab.
- The options in the Text tab are now grouped into four sections—Table of Contents, Split HTML, Footnotes, and Lists.
- The Preserve appearance from layout (For graphic/media objects) checkbox is now called Preserve appearance from layout; the Use existing image for graphic objects checkbox is now called Pass through compatible images. Both are now radio buttons (that is, mutually exclusive). We moved these options, plus the Ignore Object Export settings checkbox, from the old Object tab to the new Links tab.
- Added an option to export SVG (InDesign 2020 only) on the Links tab. To export SVG, you must select Pass through compatible images at the top of the Links tab.
- The CSS options from the old Object tab are now in the new Links tab and grouped into a section called CSS.
- The options in the old Conversion settings tab are now in the new Links tab and grouped according to the type of link—JPEG, GIF, SVG, CSS, or Equations.
- The options in the old CSS and JavaScript tabs are now in the new Advanced tab.
Introducing the new UI
Here's a summary of what you can do in each tab:
Check out the documentation to learn more.
General
Specify the input INDD or INDB file, output EPUB file, InDesign Server, EPUB format, book cover, cover image, and content order. We also added a Required Metadata section so you can easily quickly the required metadata—which includes a custom unique identifier, title, creator, and publication—without any extra clicks.
Text
Choose to remove soft returns or not. This tab is also where you can specify settings for the table of contents, splitting a document, footnotes, and lists:
- Table of contents: Specify the paragraph style for the table of contents.
- Split document: Choose if your document is split. If it is split, specify a paragraph style.
- Footnotes: Choose to display footnotes at the end of the section, after a paragraph, or inside a pop-up (EPUB 3).
- Lists: Choose how lists are formatted. Bulleted lists can either be mapped to unordered lists or converted to text. Numbered lists can either be mapped to ordered lists or converted to text.
Links
Use this tab to manage links within your document. Choose to Preserve appearance from layout or to Pass through compatible images. You can also choose to Ignore Object Export settings and specify the Image format and Resolution (ppi). To help you manage links more efficiently, we added four new sections based on the type of link you may be working with:
- JPEG options: Specify the image quality and format.
- GIF options: Specify the palette and format.
- Use SVG as (InDesign 2020 only): Choose to Use SVG as Embed Code or Object Tags. If you choose Embed Code, then the original XML code of the SVG is added in the final EPUB document. If you choose Object Tag, then the SVG is referenced in the HTML, and the .svg file is saved in the resources folder. Note: To export SVG via the Use SVG as pop-up menu, you must select Pass through compatible images at the top of the Links tab.
- CSS: Specify the image size, layout, space before (px), and space after (px). You can also set the page break to either None (previously represented by the Insert page break checkbox), Before image, After image, or Before and after image.
- Equations: Choose how the equations should be exported. Export equations as MathML (default), rasterised as an image, or you can choose to ignore equations.
Metadata
Use this tab to add optional metadata, such as a description, publisher, copyright, and subject.
Advanced
Use this tab for advanced customisations, such as adding an internal cover. In the HTML & CSS tab, you can:
- Choose to generate CSS.
- Specify the margin-top, margin-right, margin-bottom, and margin-left (px).
- Choose to preserve local overrides.
- Choose to include embeddable fonts.
You can also add additional CSS and JavaScripts.

Comments
0 comments
Please sign in to leave a comment.