The Typefi team has some tips and tricks for making the MathML equations in your Adobe InDesign template look just right.
Adjust the leading around inline equations
Inline equations are equations within a paragraph. If you apply InDesign's standard leading (the distance between two baselines of lines of type), characters of a MathZone may overlap with adjacent text lines.
In other words, your inline equations look like this:

But you want them to look like this:

* Screenshots are from movemen's MathTools V3: New features at a Glance publication, page 8.
Solution
The process for adjusting the MathZone leading depends on your use case:
| Use case | Process |
|---|---|
| I want to adjust the leading in the InDesign template myself. | Use MathTool's Auto-Adjust Leading. For instructions, see "Working with MathZone Leading" in movemen's MathTools V3: New features at a Glance publication. |
| I want Typefi to adjust the leading for me when I run the job. | Add the Adjust Spacing event script to your workflow (contact your Typefi Solutions Consultant to download the script). For instructions, see the following section. |
Using the Adjust Spacing script
This section will teach you how to use the Adjust Spacing script to automatically adjust the MathZone leading.
First, make sure you have movemen MathTools version 3 or later. Use the Check MathTools Status script to quickly check if MathTools is installed on Typefi Server. You also need an object style called mathZoneLeading and a character style called autoLeading in the InDesign template.
Download an InDesign snippet with the required object and character styles.
How does the script work?
The script identifies all inline equations and inserts a vertical straight line immediately before the MathZone and sizes the line to the MathZone’s height. Then, the script applies the mathZoneLeading object style to the line and applies the autoLeading character style to the line's parent character.
autoLeading ensures that tall-ish inline equations do not overlap with any preceding or following lines of text. And, if the MathZone is the first line in a text frame, the script prevents tall-ish equations from sticking out of the top of the text frame too.
Adding the script to your workflow
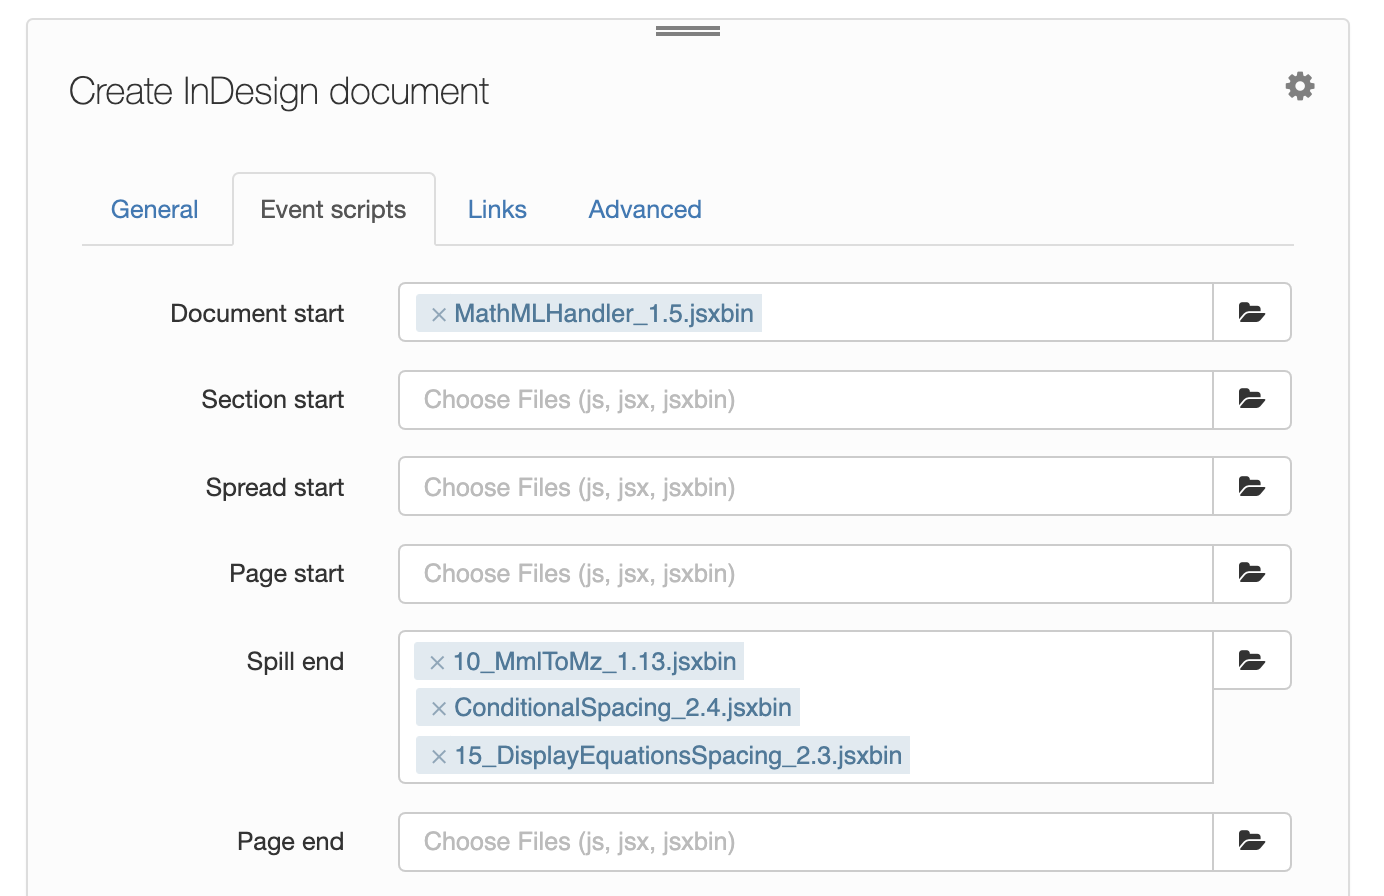
Add the Adjust Spacing script to the Spill end event in either the Create InDesign document or Create InDesign book workflow action. For help adding scripts to a workflow, see Deploying event scripts in a Typefi workflow.
The Adjust Spacing script must run after the MathML to MathZone script (required) and the Conditional Spacing script (optional).
Script names include a numbered prefix so that it's easy for you to remember the correct order they should run.

Align equations at the equals sign
When a long equation spans across lines, it can sometimes break after the equals sign (=), and not before. For example, in the screenshot below, the equation on the left breaks after the equals sign, and the equation on the right breaks before the equals sign.

This happens because MathTools splits the contents of a MathZone into "words" to allow lines to break.
Solution
There are two different ways you can make sure equations break on the equals sign:
- Run the Break Equation on Equals Sign script, or
- Run the Advanced GREP Styles script.
Option 1: Using the Break Equation on Equals Sign script
Run the Break Equation on Equals Sign script at the Page end event. If the equation breaks to two lines, the script adds a paragraph break before the last equals sign, if there is one. The script targets only equals signs that are not part of a substructure (in other words, only if it has no baseline shift applied).
Instead of using the Break Equation on Equals Sign script, you can also edit the equations in the source content to specify where the equation should break. For step-by-step instructions, see Break and horizontally align MathML equations.
Option 2: Using the Advanced GREP Styles script
Another option is to use the Advanced GREP Styles script. To use this script, it's helpful to learn a little about white space characters (breaking and nonbreaking) and GREP in InDesign.
Already familiar with breaking and nonbreaking white space characters and GREP? Jump to Using the Advanced GREP Styles script.
Breaking and nonbreaking white space characters
When you press the spacebar in InDesign, you are inserting a white space character. A white space character is a blank space that appears between characters. But, there's more to white space than just the spacebar: InDesign includes many different types of white space characters, which can be breaking or nonbreaking. That is, InDesign allows certain types of white space characters to break onto a new line, but not others.
Nonbreaking white space characters serve many different purposes, such as preventing two words—or parts of an equation—from being broken at the end of a line.
🔑 Key concept: Words separated with breaking white space characters (such as the spacebar) can break onto the next line. Words separated with nonbreaking white space characters cannot break onto the next line. InDesign treats the white space characters in a MathZone as nonbreaking.
To allow an equation to break at a white space character (for example, before the equals sign), you must convert the white space character to a discretionary line break character. Discretionary line break characters allow nonbreaking spaces (which include the white space characters in a MathZone) to break at the end of a line.
While you could manually replace each white space character followed by an operator with a discretionary line break (Type → Insert Break Character → Discretionary Line Break), the smarter approach is to use a GREP expression.
GREP
GREP is an acronym for “Globally search for the Regular Expression and Print”. Many applications, including InDesign, have adopted GREP as a powerful tool to find patterns in text. For a fantastic introduction to GREP, see Peter Kahrel's article in InDesign magazine. For additional GREP resources, see the InDesign Secrets GREP Resources page, or Peter's book, GREP in InDesign.
Using the Advanced GREP Styles script
Going one step further, we can use the Advanced GREP Styles script. (Contact your Solutions Consultant to download.) Advanced GREP Styles is a high-performance script for applying custom formatting to text that matches a GREP expression.
To use the Advanced GREP Styles script to align equations at the equals sign, create a configuration table and add a new row:
- In the Find what text column, add this GREP expression:
([\s])(?=[-=+/×−]). - In the Change to text column, add this GREP expression:
$1~k.
The GREP expression in the Find what text column is made up of two parts, denoted with square brackets []. The first set of brackets holds all the white space characters that might be present in the equations. The second set of brackets contains all the operators, or other symbols, around which the equation is allowed to break.
If a hyphen is part of the mix, list it first.
Let's break down exactly what this GREP expression means:
| GREP expression part | What it means |
|---|---|
Parentheses () around the two parts |
We can refer back to each part separately in the Change to field |
\s |
Any white space character |
Square brackets [] |
Any character in the square brackets |
(?=), also known as a "positive lookahead" |
Only find something if it’s followed by whatever is in the positive lookahead expression |
So this particular GREP expression means “Find any white space character that is followed by any of the characters in the second set of brackets. If a white space character is not followed by one of those characters, ignore it.”
The find expression would then select white space characters that fit these criteria. Remember, by using the positive lookahead expression, the search is not selecting the characters in the second set of brackets.
The GREP expression in the Change to text column replaces white space characters with itself, plus a discretionary line break.
Let's break down this GREP expression too:
| GREP expression part | What it means |
|---|---|
$1 |
Replace with the contents of the first set of parentheses in the Find what text field. In this case, we’re “replacing” the white space character with itself |
~k |
The discretionary line break character |
So this particular GREP expression means “Replace what you found (any white space character followed by an operator) with the contents of the first set of parentheses (the same white space character), plus a discretionary line break.”
Adding the script to your workflow
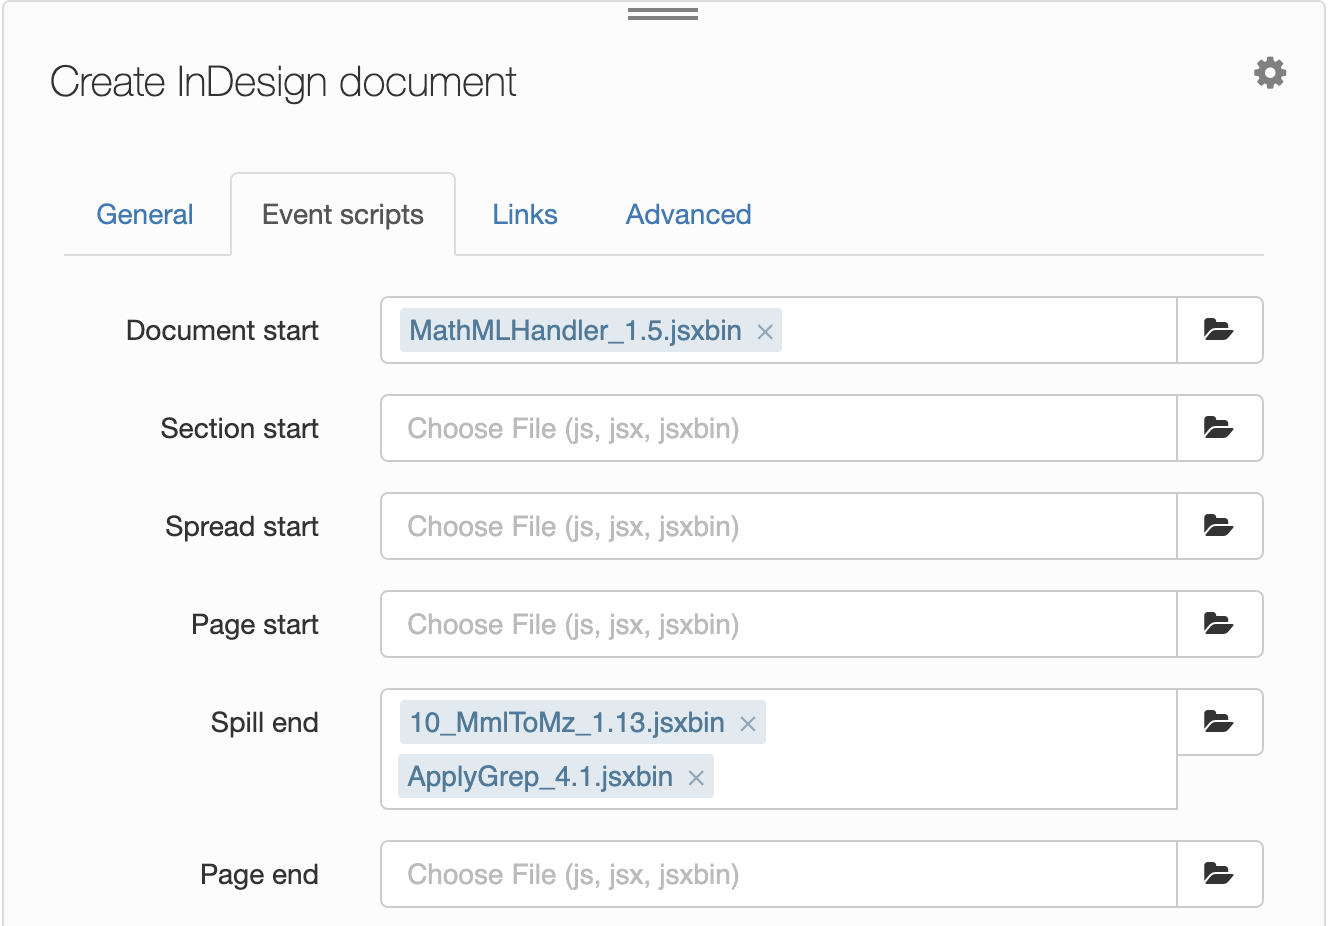
Add the Advanced GREP Styles script to the Spill end event in either the Create InDesign document or Create InDesign book workflow action. For help adding scripts to a workflow, see Deploying event scripts in a Typefi workflow.
The Advanced GREP Styles script must run after the MathML to MathZone script (required).
Script names include a numbered prefix so that it's easy for you to remember the correct order they should run.

Align equations in tables
Multi-line equations in table cells may not align how you want them to, and in some instances, the equation breaks out of the table cell. For example, in the screenshot below, the equations on the left are not aligned correctly and break out of the table cell. In contrast, the equation on the right align is aligned correctly and stays in the table cell.

Solution
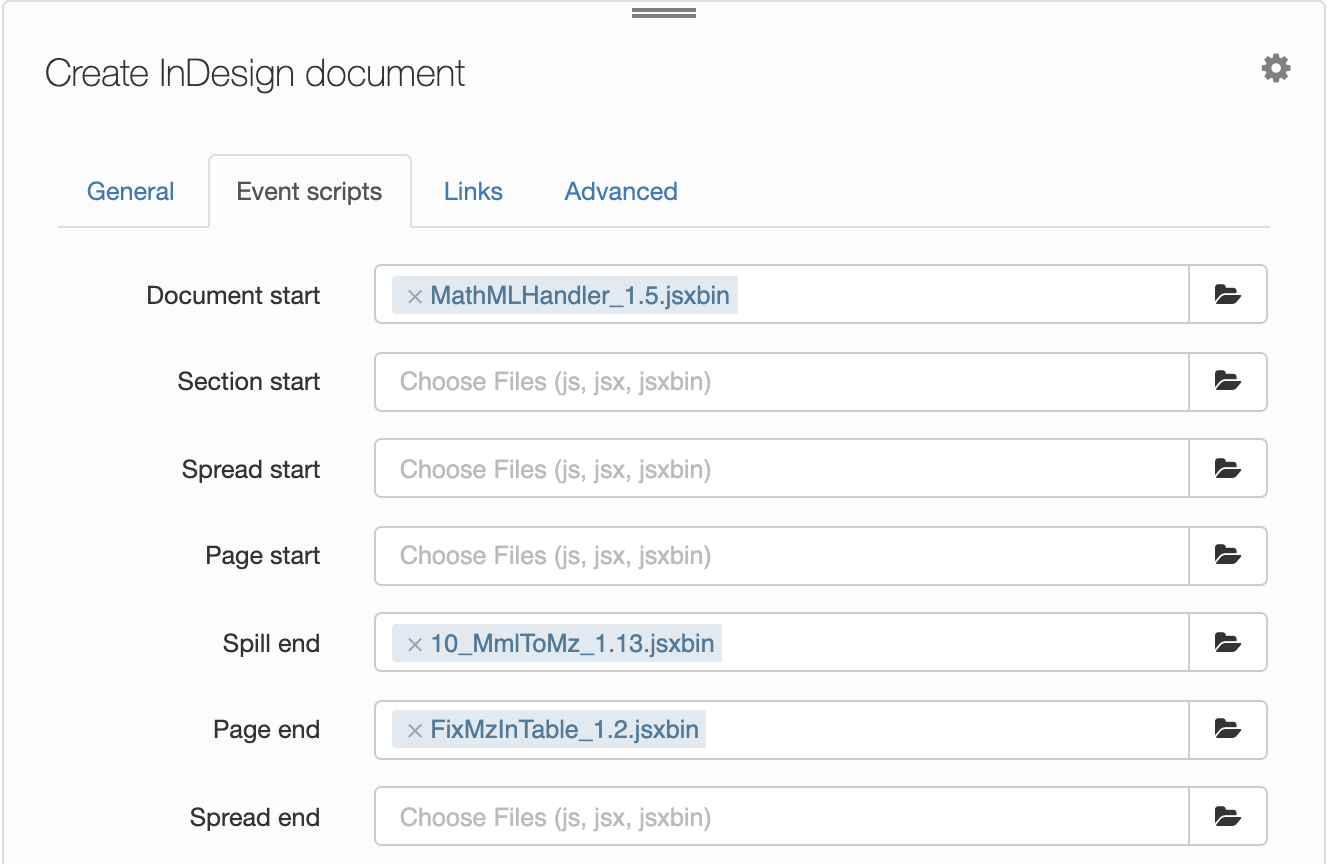
To make sure your equations are formatted correctly in tables, include the Fix MathZone in Table script (runs at Page end) to your Typefi workflow.
How does the script work?
The script finds equations in table cells and wraps them in an inline frame using a MathTools feature found in InDesign's top menu: Math → Math Zone → Wrap MathZone(s) into inline Frame(s). Wrapping equations in inline frames allows for the correct horizontal alignment of equations which fall within a table cell.
Adding the script to your workflow
Add the Fix MathZone in Table script to the Page end event in either the Create InDesign document or Create InDesign book workflow action. For help adding scripts to a workflow, see Deploying event scripts in a Typefi workflow.

Considerations when choosing fonts
Use a font that has appropriate Unicode coverage and Open Font Format features for good math rendering. If you use a font that's not math-friendly, your equations may render incorrectly.
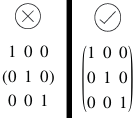
For example, the screenshot below shows the same mathematical expression represented in different fonts. The expression on the left is not in a math-friendly font, so the parentheses are not "stretchy" enough and only encapsulate the middle row. In contrast, the expression on the right uses a math-friendly font so that the parentheses encapsulate the entire expression.

Special MathML fonts
Since the display of mathematics involves many unusual and special symbols, it's important to use a font that supports these symbols. If the font does not support a particular glyph, you might see ? or a box-like  instead.
To make sure the entirety of your MathML content renders correctly, we recommend using the STIX fonts collection. STIX fonts are available for Windows, macOS, and Linux. If you’re required to use a font that doesn’t contain all the glyphs you need, you can use the Advanced GREP Styles script to change the font of specific glyphs to another font that includes them.
As a general rule, using the latest available versions of InDesign, your chosen browser (if your content will be displayed online), and an updated operating system is helpful.
Use the Copy folder workflow action in Typefi Server to make sure the fonts you choose are available in the final document.

Comments
0 comments
Please sign in to leave a comment.