
Overview
- The Typefi AutoFit panel (Window → Typefi → AutoFit) is a compact panel that brings Adobe InDesign’s Text Frame Options to your fingertips.
- With Typefi AutoFit, you can set the constraints that Adobe forgot—maximum height and maximum width—so your auto-sizing text frames don’t get lost off the page.
Step-by-step instructions
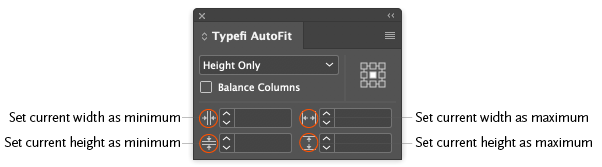
Step 1: Identify the minimum and maximum frame size buttons
In the lower portion of the Typefi AutoFit panel (Window → Typefi → AutoFit), the two controls on the left affect the minimum width and height, and the two controls on the right affect the maximum width and height.
Step 2: Set the minimum and maximum frame size
- Open the Typefi AutoFit panel (Window → Typefi → AutoFit).
- Type limits into the fields, or click the minimum or maximum width or height buttons (icons at the left of the entry fields) to copy the measurements of a selected object. TIP When multiple objects are selected, AutoFit copies and applies the measurements of each object as unique (to each object) limits. This saves you from having to repeat the process for each object.
NOTE To remove a limit, delete the entered value, or enter 0.
If a minimum value is not set, then the value is interpreted as 0. If a maximum value is not set, then the frame will continue to expand as long as there is content to fill it. If there is a lot of content, the frame could expand past the edge of the page all the way to the edge of the pasteboard.
With minimums set, a frame will never get smaller than the minimum, even if its content doesn't fill the frame.
With maximums set, a frame will never get larger than the maximum. If there is more content than will fit in the frame, the frame will become overset. If you need content to continue to another frame (a sidebar that continues to the next page, for example), a custom JavaScript can be developed that will allow this. Talk to your Solutions Consultant for more information.
If you have any questions about setting frame size constraints, please contact us. We’re happy to help.
Comments
0 comments
Please sign in to leave a comment.